Linux adalah salah satu OS Server yang banyak digunakan dikalangan Sekolah, Bisnis dan Pemerintahan. Pada tulisan ini akan dibahas bagaimana Install dan Konfigurasi LAMP (Linux, Apache, Mysql dan PHP) pada Linux Centos 6.5.
Langkah Pertama Instalasi Web Server Apache
Buka terminal pada linux centos 6.5, login sebagai root.
Install Apache2 dengan menjalanlkan perintah berikut.
[root@localhost ~]# yum install httpd -y
Jalankan service apache2 dan setting jalan otomatis saat system reboot.
[root@localhost ~]# service httpd start
[root@localhost ~]# chkconfig httpd on
Ijinkan Apache server untuk melalui port default 80 dengan menambah iptables pada firewall. Edit file /etc/sysconfig/iptables
[root@localhost ~]# nano /etc/sysconfig/iptables
Tambahkan skrip berikut.
-A INPUT -m state --state NEW -m tcp -p tcp --dport 80 -j ACCEP
Selengkapnya seperti pada gambar berikut.

Jalankan ulang iptables.
[root@localhost ~]# service iptables restart
Ujicoba Web Server Apache dengan mengetikan http://alamat_ip pada web browser

Install Mysql.
Jalankan perintah berikut untuk install Mysql.
[root@localhost ~]# yum install mysql mysql-server -y
Jalankan service mysql dan jalan otomatis saat system reboot.
[root@localhost ~]# service mysqld start
[root@localhost ~]# chkconfig mysqld on
Secara default user root pada Mysql tanpa ada password, maka untuk keamanan kita harus melakukan menambah password untuk user root. Jalankan perintah berikut.
[root@localhost ~]# mysql_secure_installation
NOTE: RUNNING ALL PARTS OF THIS SCRIPT IS RECOMMENDED FOR ALL MySQL
SERVERS IN PRODUCTION USE! PLEASE READ EACH STEP CAREFULLY!
In order to log into MySQL to secure it, we'll need the current
password for the root user. If you've just installed MySQL, and
you haven't set the root password yet, the password will be blank,
so you should just press enter here.
Enter current password for root (enter for none):
OK, successfully used password, moving on...
Setting the root password ensures that nobody can log into the MySQL
root user without the proper authorisation.
Set root password? [Y/n] y
New password: #isikan password baru
Re-enter new password: #Ulangi password yang baru diketik
Password updated successfully!
Reloading privilege tables..
... Success!
By default, a MySQL installation has an anonymous user, allowing anyone
to log into MySQL without having to have a user account created for
them. This is intended only for testing, and to make the installation
go a bit smoother. You should remove them before moving into a
production environment.
Remove anonymous users? [Y/n] y
... Success!
Normally, root should only be allowed to connect from 'localhost'. This
ensures that someone cannot guess at the root password from the network.
Disallow root login remotely? [Y/n] y
... Success!
By default, MySQL comes with a database named 'test' that anyone can
access. This is also intended only for testing, and should be removed
before moving into a production environment.
Remove test database and access to it? [Y/n] y
- Dropping test database...
... Success!
- Removing privileges on test database...
... Success!
Reloading the privilege tables will ensure that all changes made so far
will take effect immediately.
Reload privilege tables now? [Y/n] y
... Success!
Cleaning up...
All done! If you've completed all of the above steps, your MySQL
installation should now be secure.
Thanks for using MySQL!
Uji coba password root untuk Mysql yang sudah dibuat dengan login ke Mysql
[root@localhost ~]# mysql -u root -p

Install PHP
Untuk install PHP dan modul php-mysql jalankan perintah berikut.
[root@localhost ~]# yum install php -y
[root@localhost ~]# yum install php-mysql -y
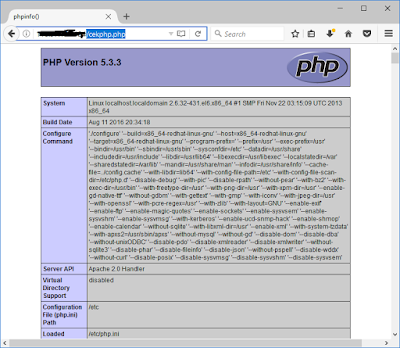
Uji coba php yang sudah di install dengan membuat contoh perintah php cekphp.php
[root@localhost ~]# nano /var/www/html/cekphp.php
Jalankan ulang service web server apache2
[root@localhost ~]# service httpd restart
Aktifkan browser dan akses alamat url : http://alamat_ip/cekphp.php
Proses Install Web server Apache2, Mysql dan PHP selesai. Tulisan berikutnya adalah Cara Install PhpMyadmin pada Linux Centos 6.5
Langkah Pertama Instalasi Web Server Apache
Buka terminal pada linux centos 6.5, login sebagai root.
Install Apache2 dengan menjalanlkan perintah berikut.
[root@localhost ~]# yum install httpd -y
Jalankan service apache2 dan setting jalan otomatis saat system reboot.
[root@localhost ~]# service httpd start
[root@localhost ~]# chkconfig httpd on
Ijinkan Apache server untuk melalui port default 80 dengan menambah iptables pada firewall. Edit file /etc/sysconfig/iptables
[root@localhost ~]# nano /etc/sysconfig/iptables
Tambahkan skrip berikut.
-A INPUT -m state --state NEW -m tcp -p tcp --dport 80 -j ACCEP
Selengkapnya seperti pada gambar berikut.

Jalankan ulang iptables.
[root@localhost ~]# service iptables restart
Ujicoba Web Server Apache dengan mengetikan http://alamat_ip pada web browser

Install Mysql.
Jalankan perintah berikut untuk install Mysql.
[root@localhost ~]# yum install mysql mysql-server -y
Jalankan service mysql dan jalan otomatis saat system reboot.
[root@localhost ~]# service mysqld start
[root@localhost ~]# chkconfig mysqld on
Secara default user root pada Mysql tanpa ada password, maka untuk keamanan kita harus melakukan menambah password untuk user root. Jalankan perintah berikut.
[root@localhost ~]# mysql_secure_installation
NOTE: RUNNING ALL PARTS OF THIS SCRIPT IS RECOMMENDED FOR ALL MySQL
SERVERS IN PRODUCTION USE! PLEASE READ EACH STEP CAREFULLY!
In order to log into MySQL to secure it, we'll need the current
password for the root user. If you've just installed MySQL, and
you haven't set the root password yet, the password will be blank,
so you should just press enter here.
Enter current password for root (enter for none):
OK, successfully used password, moving on...
Setting the root password ensures that nobody can log into the MySQL
root user without the proper authorisation.
Set root password? [Y/n] y
New password: #isikan password baru
Re-enter new password: #Ulangi password yang baru diketik
Password updated successfully!
Reloading privilege tables..
... Success!
By default, a MySQL installation has an anonymous user, allowing anyone
to log into MySQL without having to have a user account created for
them. This is intended only for testing, and to make the installation
go a bit smoother. You should remove them before moving into a
production environment.
Remove anonymous users? [Y/n] y
... Success!
Normally, root should only be allowed to connect from 'localhost'. This
ensures that someone cannot guess at the root password from the network.
Disallow root login remotely? [Y/n] y
... Success!
By default, MySQL comes with a database named 'test' that anyone can
access. This is also intended only for testing, and should be removed
before moving into a production environment.
Remove test database and access to it? [Y/n] y
- Dropping test database...
... Success!
- Removing privileges on test database...
... Success!
Reloading the privilege tables will ensure that all changes made so far
will take effect immediately.
Reload privilege tables now? [Y/n] y
... Success!
Cleaning up...
All done! If you've completed all of the above steps, your MySQL
installation should now be secure.
Thanks for using MySQL!
Uji coba password root untuk Mysql yang sudah dibuat dengan login ke Mysql
[root@localhost ~]# mysql -u root -p

Untuk install PHP dan modul php-mysql jalankan perintah berikut.
[root@localhost ~]# yum install php -y
[root@localhost ~]# yum install php-mysql -y
Uji coba php yang sudah di install dengan membuat contoh perintah php cekphp.php
[root@localhost ~]# nano /var/www/html/cekphp.php
Jalankan ulang service web server apache2
[root@localhost ~]# service httpd restart
Aktifkan browser dan akses alamat url : http://alamat_ip/cekphp.php

Proses Install Web server Apache2, Mysql dan PHP selesai. Tulisan berikutnya adalah Cara Install PhpMyadmin pada Linux Centos 6.5
Comments
Post a Comment